junio 05, 2022

Borrar la partición usando el comando Parted

El artículo original está en: https://www.thegeekdiary.com/how-to-delete-disk-partition-using-parted-command/

How To Delete Disk Partition using Parted Command

Before removing the partition, make sure to unmount any partitions on the device and turn off any swap space on the device. Do not remove a partition on a device that is in use. Also take backup of the mount point using that partition, if the data is important to you.

1. Execute parted command to start

# parted

2. Suppose, /dev/sda is the device on which to remove the partition. Use the parted commnad with the /dev/sda device as shown below:

# parted /dev/sda

3. View partition table to determine the minor number of the partition to remove:

# print

4. Remove the partition with the command rm. For example, to remove the partition with minor number 2:

# rm 2
Note: The changes start taking place as soon as Enter has been pressed, please review the command before executing and committing to it.

5. After the partition has been removed, use print command to confirm that it is removed from the partition table. You cam view the output of /proc/partitions to make sure the kernel knows the partition has been removed.

# cat /proc/partitions

6. Remove entry from the /etc/fstab file. Find the line that declares the removed partition, and remove it from the file.

# vi /etc/fstab


El artículo original está en: https://www.thegeekdiary.com/how-to-delete-disk-partition-using-parted-command/ 

Gestión de particiones con parted en Linux

 El artículo original está en: https://rm-rf.es/gestion-de-particiones-con-parted-en-linux/

Gestión de particiones con parted en Linux

gnu partedHace un tiempo aprendimos a gestionar discos y particiones con fdisk, ahora vamos ver como trabajar con el programa GNU parted, que permite particionar y redimensionar discos, así como crear, redimensionar y copiar sistemas de fichero extX, swap, FAT y FAT32 (luego veremos que es recomendable utilizar las herramientas propias de Linux en lugar que las que ofrece parted en algunos casos).

Vamos a partir de un disco (virtual) sin particionar. Lo primero que vemos al acceder a parted es un error, ya que parted necesita que el disco tenga una etiqueta (LABEL) para poder trabajar con él:

# parted /dev/sdb
GNU Parted 2.1
Usando /dev/sdb
Welcome to GNU Parted! Type 'help' to view a list of commands.
(parted) print                                                            
Error: /dev/sdb: unrecognised disk label

Normalmente se utiliza la etiqueta ‘msdos’ ya que Microsoft y OS/2 es la que reconocen, así que la asignamos con el comando mklabel:

(parted) mklabel                                                          
¿Nuevo tipo de etiqueta de disco? msdos

En todo momento podéis ver los comandos disponibles escribiendo el signo de interrogación (?)

(parted) ?                                                                
  align-check TYPE N                        check partition N for TYPE(min|opt) alignment
  check NUMBER                             do a simple check on the file system
  cp [DESDE-DISPOSITIVO] DE-NUMERO A-NUMERO   copia el sistema de ficheros a otra partición
  help [COMMAND]                           print general help, or help on COMMAND
  mklabel,mktable LABEL-TYPE               create a new disklabel (partition table)
  mkfs NUMBER FS-TYPE                      make a FS-TYPE file system on partition NUMBER
  mkpart TIPO-PART [TIPO-SF] INICIO FIN     crea una partición
  mkpartfs TIPO-PART TIPO-SF INICIO FIN     crear una partición con un sistema de ficheros
...
...
...

print: listar discos duros, particiones y espacio libre

El comando print nos permite por un lado mostrar todos los dispositivos (discos duros) reconocidos por el sistema:

(parted) print devices                                                    
/dev/sdb (268MB)
/dev/sda (12,7GB)

También las particiones de cada uno y/o el espacio libre:

(parted) print free                                                       
Model: ATA VBOX HARDDISK (scsi)
Disk /dev/sdb: 268MB
Sector size (logical/physical): 512B/512B
Partition Table: msdos

Numero  Inicio  Fin    Tamaño  Typo  Sistema de ficheros  Banderas
        32,3kB  268MB  268MB         Free Space

mkpart: crear una partición sin filesystem

Parted nos da la opción de crear una partición y al mismo tiempo el sistema de ficheros (lo vemos más adelante), pero de momento únicamente vamos a crear una partición estándar sin asignar filesystem. Podemos hacer dos cosas, o seguir el asistente o escribir la línea de comandos completa directamente. Para comenzar lo más sencillo es el asistente:

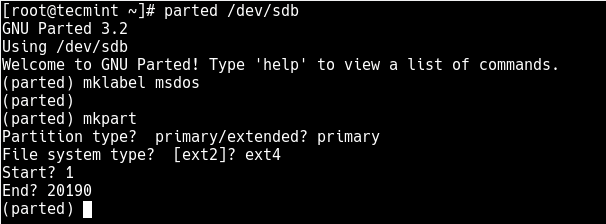
Partición primaria de 100MB que será usada como filesystem ext4

(parted) mkpart
¿Tipo de partición?  primary/primaria/extended/extendida? primary         
¿Tipo de sistema de ficheros?  [ext2]? ext4                               
¿Inicio? 1                                                                
¿Fin? 100

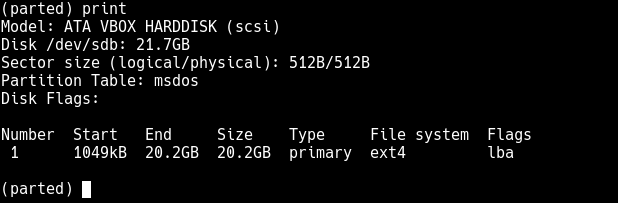
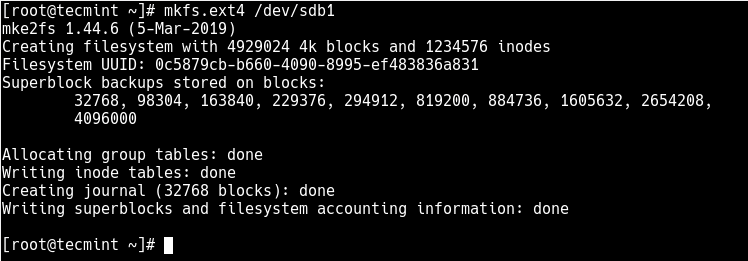
Si ejecutamos un print list veremos la nueva partición lista para ser formateada con mkfs.ext4:

(parted) print                                                            
Model: ATA VBOX HARDDISK (scsi)
Disk /dev/sdb: 268MB
Sector size (logical/physical): 512B/512B
Partition Table: msdos

Numero  Inicio  Fin     Tamaño  Typo     Sistema de ficheros  Banderas
 1      1049kB  99,6MB  98,6MB  primary

mkpartfs: crear una partición con filesystem

Como comentaba antes, parted permite dar formato a la partición en el proceso de creación, aunque claramente vemos al ejecutarlo que recomiendan encarecidamente hacer uso de las herramientas adecuadas para ello (mkfs.extX, e2fsprogs). Así que simplemente vamos a ver como hacerlo por curiosidad (además no soporta ni ext3 ni ext4, sólo ext2…):

WARNING: you are attempting to use parted to operate on (mkpartfs) a file system.
parted’s file system manipulation code is not as robust as what you’ll find in
dedicated, file-system-specific packages like e2fsprogs. We recommend
you use parted only to manipulate partition tables, whenever possible.
Support for performing most operations on most types of file systems
will be removed in an upcoming release.

(parted) mkpartfs                                                         
WARNING: you are att.....
will be removed in an upcoming release.
¿Tipo de partición?  primary/primaria/extended/extendida? primary         
¿Tipo de sistema de ficheros?  [ext2]? ext2                               
¿Inicio? 100                                                              
¿Fin? 200

Y ya tenemos la partición con sistema de ficheros ext2:

(parted) print                                                            
Model: ATA VBOX HARDDISK (scsi)
Disk /dev/sdb: 268MB
Sector size (logical/physical): 512B/512B
Partition Table: msdos

Numero  Inicio  Fin     Tamaño  Typo     Sistema de ficheros  Banderas
 1      1049kB  99,6MB  98,6MB  primary
 2      99,6MB  200MB   101MB   primary  ext2
# mount /dev/sdb2 /test
# df -h | grep /test
/dev/sdb2              90M   13K   86M   1% /test
# umount /test

rm: eliminar una partición

Para eliminar una partición con parted es tan simple como ejecutar «rm» seguido del número de la partición:

(parted) print                                                            
Model: ATA VBOX HARDDISK (scsi)
Disk /dev/sdb: 268MB
Sector size (logical/physical): 512B/512B
Partition Table: msdos

Numero  Inicio  Fin     Tamaño  Typo     Sistema de ficheros  Banderas
 1      1049kB  99,6MB  98,6MB  primary
 2      99,6MB  200MB   101MB   primary  ext2
(parted) rm 2  /pre>

check: comprobación de un filesystem

Existen otras opciones, como por ejemplo hacer un check al sistema de ficheros, pero igual que con mkpartfs recomiendan utilizar herramientas propias del sistema como fsck. Además, no soportan sistemas de ficheros ext4 o ext3:

(parted) check 1                                                          
WARNING: you are attempting to use parted to operate on (check) a file system.
parted's file system manipulation code is not as robust as what you'll find in
dedicated, file-system-specific packages like e2fsprogs.  We recommend
you use parted only to manipulate partition tables, whenever possible.
Support for performing most operations on most types of file systems
will be removed in an upcoming release.
Sin Implementación: El soporte para abrir el sistema de ficheros ext4 aún no está implementado.


Si revisáis la página man o la propia salida de ‘?’ veréis otras opciones, como mkfs para formatear sistemas de ficheros (como comentaba antes, no recomendable) y otras más interesantes como rescue, que permite recuperar una partición perdida indicando su posición de inicio y fin:

(parted) rescue INICIO FIN

Os recomiendo como siempre revisar la página man o la salida de ‘?’ para descubrir todas sus posibilidades, como redimensionar una partición con resize, moverla con move, etc. Eso sí, recordad que es preferible usar los comandos/herramientas propios del sistema para mayor seguridad en estos casos.


 El artículo original está en: https://rm-rf.es/gestion-de-particiones-con-parted-en-linux/

Como crear una nueva partición con el sistema de archivos ext4 en Linux

El artículo original está en: https://www.tecmint.com/create-new-ext4-file-system-partition-in-linux/


How to Create a New Ext4 File System (Partition) in Linux


The ext4 or fourth extended filesystem is a widely-used journaling file system for Linux. It was designed as a progressive revision of the ext3 file system and overcomes a number of limitations in ext3.

It has significant advantages over its predecessor such as improved design, better performance, reliability, and new features. Although it is best suited for hard drives, it can also be used on removable devices.

This article will show you how to create a new ext4 file system (partition) in Linux. We will first of all look at how to create a new partition in Linux, format it with the ext4 file system and mount it.

Note: For the purpose of this article:

  • We will assume that you have added a new hard drive to your Linux machine, in which you will create the new ext4 partition, and
  • If you are operating the system as an administrative user, use the sudo command to gain root privileges to run the commands shown in this article.

Creating a New Partition in Linux

List the partitions using the fdisk -l or parted -l commands to identify the hard drive you want to partition.

# fdisk -l 
OR
# parted -l
List Linux Partitions

Looking at the output in the screenshot above, we have two hard disks added on the test system and we will partition disk /dev/sdb.

Now use parted command to start creating the partition on the selected storage device.

# parted /dev/sdb

Now give the new disk a label using the mklabel command.

(parted) mklabel msdos

Then create a partition using the mkpart command, give it additional parameters like “primary” or “logical” depending on the partition type that you wish to create. Then select ext4 as the file system type, set the start and end to establish the size of the partition:

(parted) mkpart                                                            
Partition type? primary/extended? primary 
File system type? [ext2]? ext4 
Start? 1 
End? 20190
Create a New Ext4 Partition

To print the partition table on the device /dev/sdb or detailed information about the new partition, run the print command.

(parted) print
Print Partition Table

Now exit the program using the quit command.

Formatting New Ext4 Partition

Next, you need to properly format the new partition with the ext4 file system type using the mkfs.ext4 or mke4fs command as follows.

# mkfs.ext4 /dev/sdb1
OR
# mke4fs -t ext4 /dev/sdb1
Format a New Ext4 Partition

Then label the partition using the e4label command as follows.

# e4label /dev/sdb1 disk2-part1
OR
# e2label /dev/sdb1 disk2-part1

Mounting New Ext4 Parition in File System

Next, create a mount point and mount the newly created ext4 partition file system.

# mkdir /mnt/disk2-part1
# mount /dev/sdb1 //mnt/disk2-part1

Now using the df command, you can list all file systems on your system together with their sizes in a human readable format (-h), and their mount points and file system types (-T):

# df -hT
Show Linux Filesystem with Mount Points

Lastly, add the following entry in your /etc/fstab to enable persistent mounting of the file system, even after a reboot.

/dev/sdb1   /mnt/disk2-part1  ext4   defaults    0   0

You might also like to read these following related articles:

  1. How to Add New Disks Using LVM to an Existing Linux System
  2. How to Add a New Disk to an Existing Linux Server
  3. 10 Best File and Disk Encryption Tools for Linux
  4. How to Create a Virtual HardDisk Volume Using a File in Linux

That’s all! In this article, we’ve explained how to create a new partition in Linux, format it with ext4 file system type and mount it as a filesystem. For more information or to share any queries with us, use the feedback form below


El artículo original está en: https://www.tecmint.com/create-new-ext4-file-system-partition-in-linux/


¿Cómo poner el conteo de las filas en una consulta en MySql?

 ¿Cómo poner el conteo de las filas en una consulta en MySql? SELECT  @rownum := @rownum + 1 AS contador,  /*Contador*/ t.*  /* nombre d...