mayo 27, 2019

Números múltiplos en php

Números múltiplos en php

A veces en los bucles necesitamos saber si un número es múltiplo de otro. Con un sistema de paginar los resultados, y la solución es realmente fácil:

La explicación es muy sencilla, si el valor de la variable que utilizamos para recorrer el múltiplo es $i, sólo debemos comprobar si ese valor, dividido entre el número del que queremos averiguar sus múltiplos tiene como resto 0. Para ello utilizamos : $i%$numero==0

Fuente: https://www.adaweb.es/numeros-multiplos-en-php/

mayo 22, 2019

How to Add a Menu Item in WordPress Without Linking to a Page

How to Add a Menu Item in WordPress Without Linking to a Page

>How to Add a Menu Item in WordPress Without Linking to a Page
By default, WordPress requires a link when adding an item to your website’s menu. But when you create a drop-down menu, you might not want the parent item to be linked to any page – just the sub-menu items.
You can see this on my website as well. If you check out the Services menu item at the top, you’ll see that it’s not linking to any page.
So, how can you do that yourself? Very easily actually, and in this post, I’ll show you how!

Adding a menu item in WordPress without linking to a page

Step 1 – Log in to WordPress and go to Appearance -> Menus.
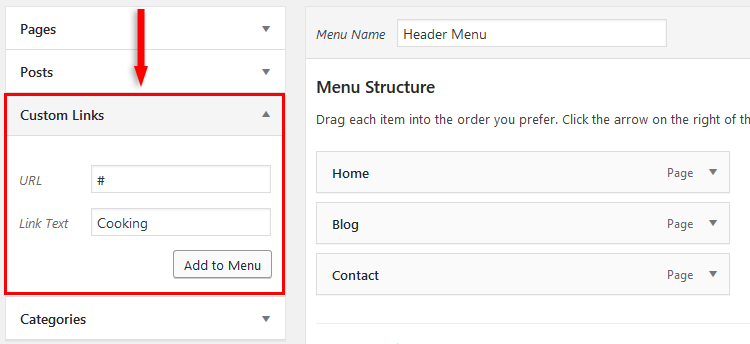
Step 2 – Select the Custom Links section, add a Link Text (name of the menu item) and the # sign in the URL field.
custom links menu wordpress
Step 3 – Press the Add to Menu button.
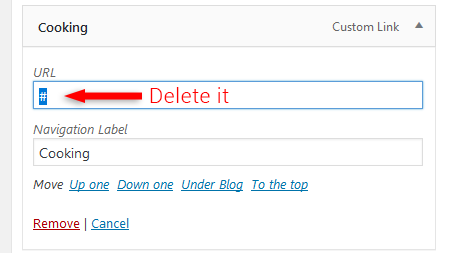
Step 4 – Open the custom link that you added to the menu and remove the # sign.
menu item without link in wordpress
Step 5 – Add your sub-menu items and press the Save Menu button.
That’s it!
Now your WordPress menu item will not link to any page.

That’s a wrap

Hope you found the tutorial useful and comprehensive, and you managed to add a menu item without a link attached to it.
Don’t forget to share it to help out others!
If you have any questions or thoughts, drop a comment or send a message via contact or Facebook page.
You can also hit the follow button on Twitter and subscribe to the YouTube channel.
If you want to start your own WordPress blog, or need a website for your business, ThemeSkills’ WordPress installation service is at your disposal! On-going WordPress support and maintenance is on the menu as well!
You can also purchase a ready-made WordPress website with hosting and support included!

mayo 21, 2019

Instalar Dovecot con postfix en CentOS

Install and configure Dovecot on CentOS

  • Last updated on: 2018-10-29
  • Authored by: Lee Jelley
If you have installed the Postfix mail server to operate as the Simple Mail Transfer Protocol (SMTP) service on an email server, you might still need a way to retrieve the incoming mail from the server.
This article shows you how to install and configure Dovecot, an open-source Internet Message Access Protocol (IMAP) and Post Office Protocol version 3 (POP3) server application designed specifically for Linux® and UNIX® operating systems. Dovecot retrieves emails from Postfix and delivers them to the relevant mailbox on the server.
You can get your mail through Dovecot by using either the POP3 or the IMAP protocol.

Prerequisites

You need the following operating system and software to use Dovecot:
  • A CentOS® 6.0 or later Linux distribution
  • Postfix

Install Dovecot

Download and install the Dovecot package by running the following command:
$ sudo yum install dovecot

Configure Dovecot

After you install Dovecot, you need to configure the services in the configuration file at /etc/dovecot/dovecot.conf. This example uses the nano text editor, but you can use any text editor that you want.
  1. Use the following command to open the file in nano:
    $ sudo nano /etc/dovecot/dovecot.conf
    
  2. Uncomment the following lines in the file and, if necessary, change them to reflect your plans for the environment:
    protocols = imap pop3
    mail_location =  maildir:~/Maildir
    
    These lines contain the following parameters:
    • protocols: The protocols through which users can access their email
    • mail_location: The format and the location of each user’s mailbox

Configure the authentication process file

Next you need to configure the authentication process file, which is located at /etc/dovecot/conf.d/10-auth.conf.
  1. Use the following command to open the file in nano:
    $ sudo nano /etc/dovecot/conf.d/10-auth.conf
    
  2. Uncomment the following line in the file and, if necessary, change them to reflect your plans for your environment:
    auth_mechanisms = plain login
    
    The auth_mechanisms parameter specifies the method that the email client uses to authenticate with Dovecot.

Configure the mail location

You can set the location for your mail by editing the configuration file at /etc/dovecot/conf.d/10-mail.conf.
  1. Use the following command to open the file in nano:
    sudo nano /etc/dovecot/conf.d/10-mail.conf
    
  2. Either add or uncomment the following line in the configuration file:
    mail_location = maildir:~/Maildir
    

Configure Postfix SMTP authentication

Next you need to configure the UNIX socket for Postfix SMTP authentication (SMTP AUTH). The file that you need to change is located at /etc/dovecot/conf.d/10-master.conf.
  1. Use the following command to open the file in nano:
    sudo nano /etc/dovecot/conf.d/10-master.conf
    
  2. Comment out the following lines:
     #unix_listener auth-userdb {
         #mode = 0600
         #user =
         #group =
       #}
    
  3. In the same file, edit the following lines:
     # Postfix smtp-auth
       unix_listener /var/spool/postfix/private/auth {
         mode = 0666
         user = postfix
         group = postfix
       }
    

Configure POP3

Finally, configure the /etc/dovecot/conf.d/20-pop3.conf file, which enables older and less popular email clients to connect and transmit messages correctly.
  1. Use the following command to open this file in nano:
    sudo nano /etc/dovecot/conf.d/20-pop3.conf
    
  2. Uncomment or add the following lines:
    pop3_uidl_format = %08Xu%08Xv
    pop3_client_workarounds = outlook-no-nuls oe-ns-eoh
    

Create a mailbox

The example in this section adds a mailbox that a hypothetical user named Joe Bloggs (joe.bloggs) can use to send and receive emails.
You can create a user for this example, or you can use an existing user.
  1. If necessary, use the following command to make a new user:
    sudo useradd joe.bloggs
    
  2. Use the following command to create the mail directory for your user:
    sudo mkdir /home/joe.bloggs/Maildir
    
  3. Give ownership of the mailbox that you just created to joe.bloggs by changing its permissions:
    sudo chown joe.bloggs:joe.bloggs /home/joe.bloggs/Maildir
    sudo chmod -R 700 /home/joe.bloggs/Maildir
    

Start Dovecot

Use the following steps to start the Dovecot service:
  1. Use the following chkconfig command to verify that the Dovecot application will run when the server is restarted:
    sudo chkconfig --level 345 dovecot on
    
  2. Use the following command to start the Dovecot service:
    sudo service dovecot start
    

Configure Postfix

Next, you need to configure Postfix to enable your email client to connect to your new SMTP server.
  1. Use the following command to open the file at /etc/postfix/main.cf in nano:
    sudo nano /etc/postfix/main.cf
    
  2. Add the following lines to the file:
     smtpd_sasl_auth_enable = yes
     smtpd_sasl_security_options = noanonymous
     smtpd_sasl_local_domain = $myhostname
     smtpd_recipient_restrictions = permit_sasl_authenticated,permit_mynetworks, reject_unauth_destination
     broken_sasl_auth_clients = yes
     smtpd_sasl_type = dovecot
     smtpd_sasl_path = private/auth
    
  3. After you have added the preceding lines, exit the main.cf file and restart the Postfix service by using the following command:
    sudo service postfix restart
    

Add ports to iptables

Now that you have enabled secure SMTP Secure Sockets Layer (SSL), you should allow connections to port 587 by opening the port for your server in iptables.

  1. Add the rule for this port by entering the following command:
    sudo iptables -I INPUT 2 -p tcp --dport 587 -j ACCEPT
    
  2. Add the POP and IMAP ports, as well as their secure counterparts:
    sudo iptables -I INPUT 3 -p tcp --dport 110 -j ACCEPT
    sudo iptables -I INPUT 4 -p tcp --dport 143 -j ACCEPT
    sudo iptables -I INPUT 5 -p tcp --dport 993 -j ACCEPT
    sudo iptables -I INPUT 6 -p tcp --dport 995 -j ACCEPT
    
  3. Use the following commands to save the iptables rules and restart iptables:
    sudo /etc/init.d/iptables save    sudo /etc/init.d/iptables restart
    

mayo 20, 2019

Montar una USB en linux

How to Mount USB Drive in a Linux System?


Do you know “how to use USB memory sticks with Linux”, If you are not sure then this article describes “how to mount USB drive on a Linux system with command line interface”
Universal serial bus, or USB (also known as Flash drive), is an electronic communications protocol that is commonly used in computer accessories and other small devices. If you have an up-to-date Linux system and a modern Desktop environment, your device should show up on your desktop, with no need to open a console. There are few important factors which are involved in learning how to mount USB drive with Linux machine.
Following are the step by step instructions to understand further –

Step 1: Plug-in USB drive to your PC

GTY_usb_drive_jef_131204_16x9_992

Step 2 – Detecting USB Drive

After you plug in your USB device to your Linux system USB port, It will add new block device into /dev/ directory. To verify it, use the following command –
 $ sudo fdisk -l 
The sample output should be like this –
Disk /dev/sdb: 15.7 GB, 15664676864 bytes
255 heads, 63 sectors/track, 1904 cylinders, total 30595072 sectors
Units = sectors of 1 * 512 = 512 bytes
Sector size (logical/physical): 512 bytes / 512 bytes
I/O size (minimum/optimal): 512 bytes / 512 bytes
Disk identifier: 0x00000000

   Device Boot      Start         End      Blocks   Id  System
/dev/sdb1   *          32    30595071    15297520    c  W95 FAT32 (LBA)
We can observe from the above result that, device boot, blocks, id and system format are displayed.

Step 3 – Creating Mount Point

To mount the USB, use the following command –
$ mount /dev/sdb1 /mnt
To create a directory in the mounted device, use the following commands –
$ cd /mnt
/mnt$ mkdir john
The above command creates a directory called john in USB device.

Step 4 – Delete a Directory in USB

To delete a directory in USB, use the following command –
/mnt$ rmdir john

Step 5 – Formatting the USB

You should unmount the device first to format the USB device, then use the following command to unmount the device –
$ sudo umount /dev/sdb1
Now use either of the commands as per file system based on your requirement. To format a USB drive, users generally prefer VFAT or NTFS file systems because they can be easily mounted on Windows operating systems and Linux systems.

Format vFat FileSystem

To format USB with vFat File System, use the following command –
$ sudo mkfs.vfat /dev/sdb1

Format NTFS FileSystem

To format a USB Flash Drive with NTFS file system, use the following command –
$ sudo mkfs.ntfs /dev/sdb1

Format EXT4 FileSystem

To format a USB with EXT4 file system, use the following command –
$ sudo mkfs.ext4 /dev/sdb1
Congratulations! Now, you know “How to Mount USB Drive in a Linux System?”. We’ll learn more about these types of commands in our next Linux post. Keep reading!

Fuente: https://www.tutorialspoint.com/articles/how-to-mount-usb-drive-in-a-linux-system

Reparar una USB corrupta

How to Repair a Corrupted USB Drive in Linux

Everyone has a flash drive. They’re great little things, and they make safeguarding data easy. However, sometimes flash drives can get corrupted or just flat out quit working. If you’re a Linux user and this has happened to you, there’s an easy fix to all of this. In this article we’ll go over a few really simple tricks on how you can get your flash drive back in working order.
Note: the tricks outlined in this article aren’t necessarily exclusive to USB drives and can be used on hard drives too.

Removing bad blocks from the USB drive with fsck

An easy way to repair a flash drive, or any drive really, is to use the fsck tool. This tool is great for removing bad file blocks, as most (if not all) corruption and unreadability comes from problems like this. To remove the corrupted file blocks from the USB flash drive, open a terminal window and enter the following commands.
Users must figure out what the drive designation is on the system before things can move forward. Do this by entering the lsblk command. This will list all of the attached disks on your system.
Note: the lsblk command lists all disks, not just USB drives. Pay close attention to the output, as it is easy to mistake a hard drive for a flash drive.
linux-flash-drive-list-usb-drive
To remove the bad file block, run the fsck command on either a specific partition (e.g. /dev/sdc1), or the entire disk (e.g. /dev/sdc). Once completed, the USB drive will have a healthy partition again and be fully operational on Linux.
Note: this tutorial assumes that the flash drive is /dev/sdc (or /dev/sdc1). Users may have different labels for their flash drive on their system.
linux-flash-drive-fsck-options

Zeroing the USB drive

Sometimes a USB drive can be totally unreadable to the point where it is no longer worth saving. When this happens the best route is often to just zero out the data and start over. The best tool for the job in this situation is dd, and it works quite well.
Start by taking the drive label that was found earlier with the lsblk command, and apply the same logic (remember that /dev/sdc1 is a partition, and /dev/sdc is an entire device).

Making a new file system

linux-flash-drive-new-file-system
Zeroing a USB drive (or any device for that matter) renders the data on it totally useless. This means that you’ll need to create a new data partition. Choose a file system, and then run the command!
Fat32
Ext4
NTFS

Conclusion

USB flash drives are useful devices. They make it easy for people to easily transfer data from one computer to the other, regardless of the operating system it’s running. That’s why it’s so important to know what to do when the drive is no longer accessible. Luckily, Linux ships with some really useful tools that make saving a flash drive quite easy.
Image credit: CES Thumb-Drive Style Press Kits


Fuente: https://www.maketecheasier.com/repair-corrupted-usb-drive-linux/

mayo 07, 2019

Quitar "-2" de los enlaces permanentes en Wordpress

You just created a new page on your business’ WordPress site. You hit Publish, and then check out finished page. In your address bar, you notice something you didn’t expect. Instead of a clean URL, there’s a -2 at the end. For example, the URL is mysite.com/about-2/ instead of mysite.com/about/.
You try to edit the page, delete the -2 from the permalink, and click OK. But the -2 stays!
Now it seems you’re stuck with an unprofessional-looking URL on your WordPress site. It’s not ideal. To get the permalinks you want for your business, learn why the -2 happens, and how you can get rid of it.

The Cause

Every post, page, and media file in WordPress has a unique permalink. When you create a new post, page or media file with the same name as a previously existing item, WordPress will add a -2 to the end of the permalink (URL). It prevents duplication.
WordPress automatically generates permalinks based on the title of the page, post, or media file. As a result, you might not be aware that the URL you’re trying to use already exists until the -2 pops up in the permalink.

The Fix

This video walks through how to how to remove the -2 from a WordPress URL (permalink).

What if your permalink problem isn’t that simple? You can still fix it with these steps.

1. Find the Item

Make sure you’re logged into your WordPress account. Type the desired permalink into your browser to see what’s there. If something loads, you can click the Edit button in the Admin Toolbar at the top of the page and change it.
If that doesn’t work, then you’ll have to do a little digging. Try the following in order:
Maybe the item isn’t published. Search through your site’s pages, posts, and custom post types (such as portfolio items or testimonials). To make this faster, use the search box on each of those pages in the WordPress admin area.
Maybe a media item is using the permalink. Search through the Media Library.
Maybe the item is in the Trash. Go to the admin page for pages, posts, and custom post types (such as portfolio items or testimonials). Then click the Trash link at the top of the page. Search there. You can’t see the permalink of items in the Trash, so you’ll need to first Restore the item, then click the All link at the top of the page and look there.
What if you still can’t find the item? Search your database directly. We recommend you do this only if you’re familiar with MySQL, because a misstep could break your site. Here’s a tutorial on searching a MySQL database if you’re familiar with MySQL but need specific instructions.

2. Change the Permalink

Once you find the item that has the permalink you want to use, you need to permanently delete it or change its permalink.
If you’ll never need the item again: Delete it by clicking Trash or Move to Trash. Typically this action frees up the permalink immediately. If it doesn’t, go to Trash and hit Permanently Delete.
If you may need the item again: Edit the item, then edit the Permalink. Next click OK, and then Update.
There are a few extra steps to change the permalink of a media file. Edit the media item, click Screen Options at the top of the screen, and check the box for Slug. Scroll down to the Slug box at the bottom of the page and edit the slug. Click Update.
Once you’ve freed up your desired permalink, edit the item you want to have the permalink, and the Permalink. Click OK, and then Update (or Publish).

Let OptimWise Maintain Your WordPress Site

You’d rather manage your business than manage your WordPress site. At OptimWise, we know how to take care of WordPress sites for businesses.We’ve been doing it since 2010! Sign up for your WordPress Maintenance Plan today.

¿Cómo poner el conteo de las filas en una consulta en MySql?

 ¿Cómo poner el conteo de las filas en una consulta en MySql? SELECT  @rownum := @rownum + 1 AS contador,  /*Contador*/ t.*  /* nombre d...