By
default, WordPress requires a link when adding an item to your
website’s menu. But when you create a drop-down menu, you might not want
the parent item to be linked to any page – just the sub-menu items.
You can see this on my website as well. If you check out the Services menu item at the top, you’ll see that it’s not linking to any page.
So, how can you do that yourself? Very easily actually, and in this post, I’ll show you how!
Step 2 – Select the Custom Links section, add a Link Text (name of the menu item) and the # sign in the URL field.
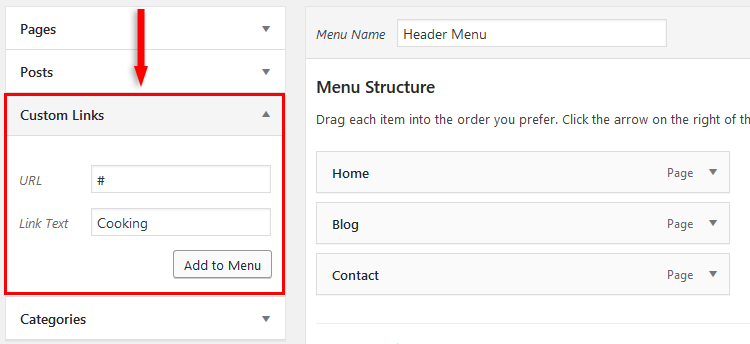
Step 3 – Press the Add to Menu button.
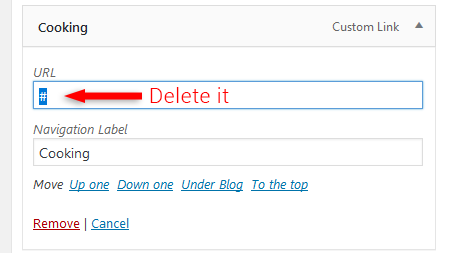
Step 4 – Open the custom link that you added to the menu and remove the # sign.
Step 5 – Add your sub-menu items and press the Save Menu button.
That’s it!
Now your WordPress menu item will not link to any page.
Don’t forget to share it to help out others!
If you have any questions or thoughts, drop a comment or send a message via contact or Facebook page.
You can also hit the follow button on Twitter and subscribe to the YouTube channel.
If you want to start your own WordPress blog, or need a website for your business, ThemeSkills’ WordPress installation service is at your disposal! On-going WordPress support and maintenance is on the menu as well!
You can also purchase a ready-made WordPress website with hosting and support included!
You can see this on my website as well. If you check out the Services menu item at the top, you’ll see that it’s not linking to any page.
So, how can you do that yourself? Very easily actually, and in this post, I’ll show you how!
Adding a menu item in WordPress without linking to a page
Step 1 – Log in to WordPress and go to Appearance -> Menus.Step 2 – Select the Custom Links section, add a Link Text (name of the menu item) and the # sign in the URL field.
Step 3 – Press the Add to Menu button.
Step 4 – Open the custom link that you added to the menu and remove the # sign.
Step 5 – Add your sub-menu items and press the Save Menu button.
That’s it!
Now your WordPress menu item will not link to any page.
That’s a wrap
Hope you found the tutorial useful and comprehensive, and you managed to add a menu item without a link attached to it.Don’t forget to share it to help out others!
If you have any questions or thoughts, drop a comment or send a message via contact or Facebook page.
You can also hit the follow button on Twitter and subscribe to the YouTube channel.
If you want to start your own WordPress blog, or need a website for your business, ThemeSkills’ WordPress installation service is at your disposal! On-going WordPress support and maintenance is on the menu as well!
You can also purchase a ready-made WordPress website with hosting and support included!
No hay comentarios:
Publicar un comentario